
You’ve probably scrubbed that dark spot on your bathroom wall three times already, and it just keeps coming back. Here’s the truth most cleaning guides skip: surface scrubbing doesn’t kill mold spores or fix the moisture problem feeding them. Real bathroom wall mold removal means following a specific sequence that eliminates what you see, kills what’s hiding, and stops it from returning. This guide walks through the complete process with solutions that actually work for different wall materials and mold situations.
Step-by-Step Guide to Removing Mold from Bathroom Walls
Bathroom wall mold shows up in most homes eventually, and you can handle it yourself with the right approach. The key isn’t just scrubbing away what you see. It’s following a proper sequence that kills spores, removes staining, and sets up the surface to stay clean.
Complete Mold Removal Process:
-
Assess the contaminated area and extent of damage. Check how much wall space shows mold growth, whether it’s surface level or penetrating deeper, and if surrounding areas feel damp or soft to the touch.
-
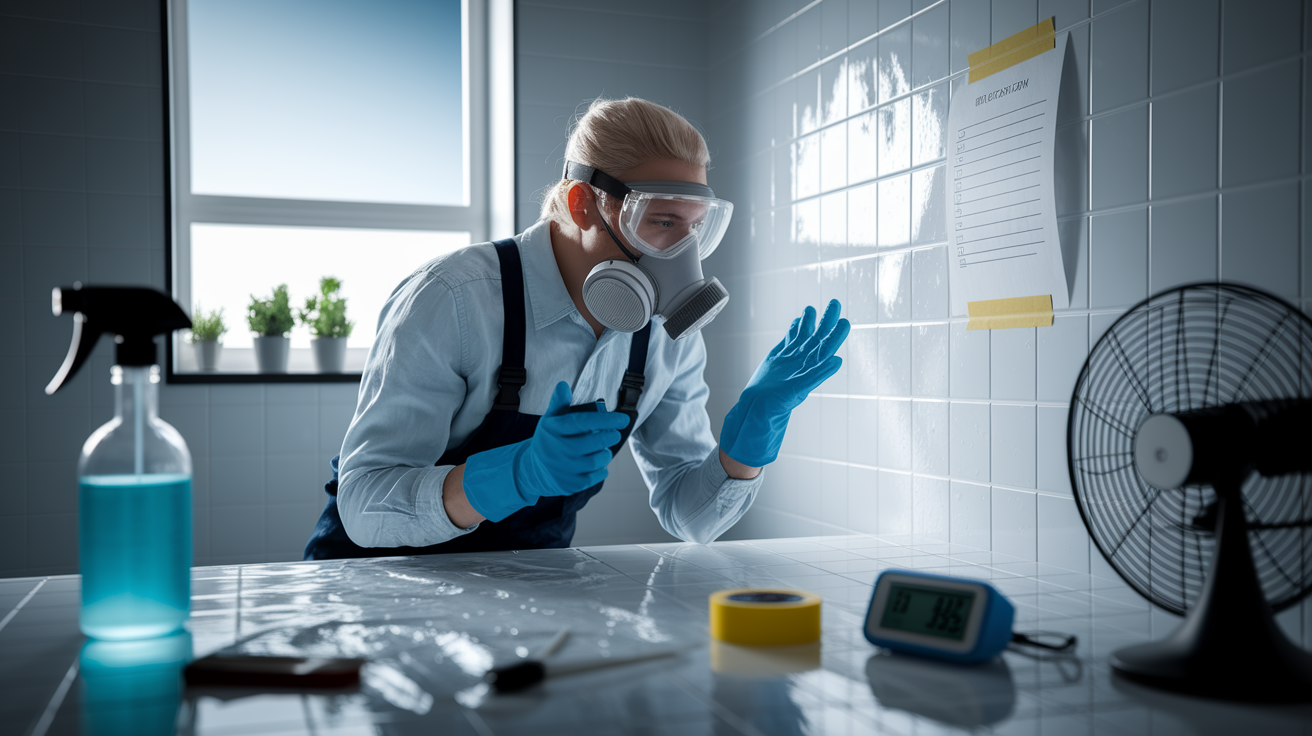
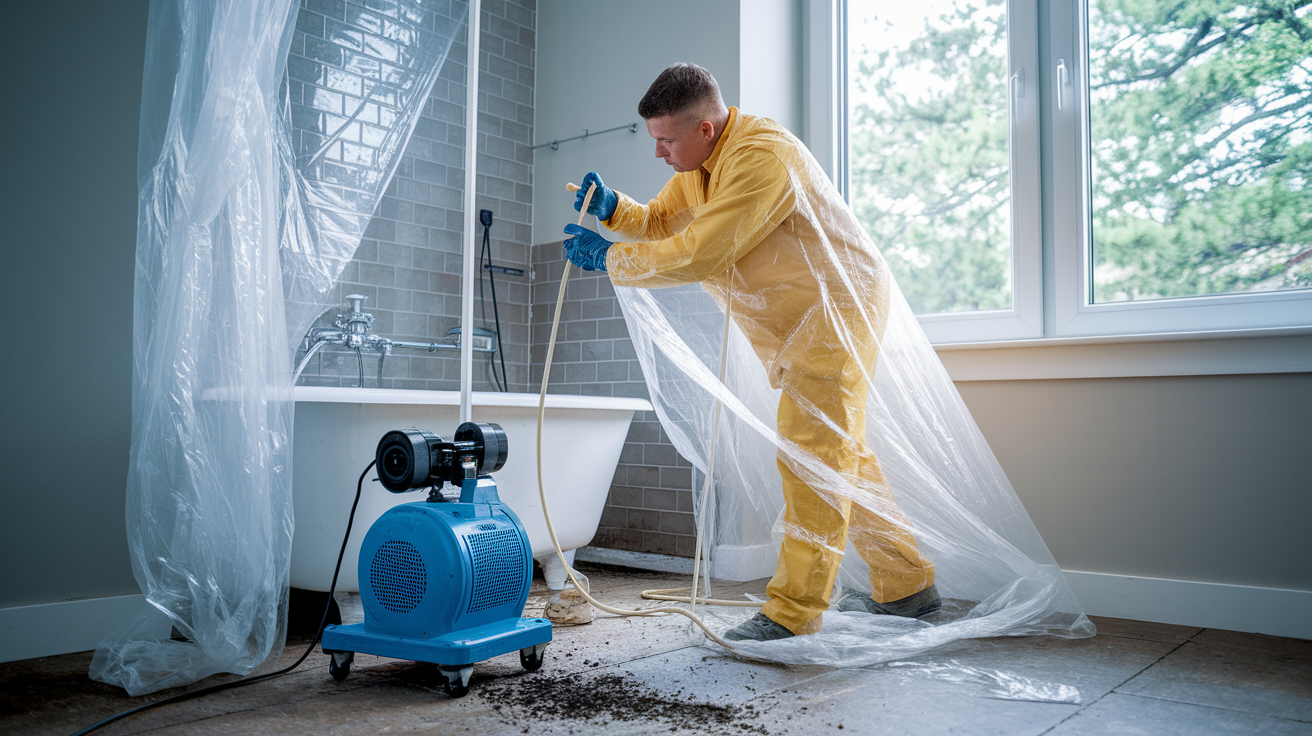
Prepare protective equipment and ensure proper ventilation.
Put on an N95 or N100 respirator mask to filter airborne spores that become active during cleaning. Wear waterproof rubber gloves to prevent skin contact with mold and cleaning solutions. Wear safety goggles to protect eyes from spores and chemical splash. Wear long sleeved clothing and pants to minimize skin exposure. Set up ventilation by opening windows and running the exhaust fan. Position a HEPA filter or air purifier if available to capture floating spores. -
Protect surrounding surfaces from cleaning solutions. Lay down plastic sheeting or old towels on floors and fixtures, tape off areas you don’t want to get wet, and remove or cover bathroom items that could be damaged by spray.
-
Select and prepare appropriate cleaning solution. Mix your chosen cleaner according to proper ratios (covered in the next section), pour it into a clean spray bottle, and shake gently to combine ingredients.
-
Apply solution using spray bottle method. Spray affected areas thoroughly until the surface is wet but not dripping, working from top to bottom to prevent solution from running over already treated spots.
-
Allow proper contact time for solution effectiveness. Let the cleaning solution sit on the mold for 10 to 15 minutes without wiping so it can penetrate and kill spores beneath the surface.
-
Scrub affected areas with appropriate brush. Use a stiff bristled brush for grout and textured surfaces or a softer brush for painted walls, scrubbing in circular motions to break up mold colonies and lift staining.
-
Wipe surface clean and remove residue. Use clean microfiber cloths or paper towels to wipe away dead mold, loosened material, and cleaning solution, rinsing and replacing cloths frequently to avoid spreading spores.
-
Dry thoroughly using fans or dehumidifier. Point a fan directly at the cleaned wall, run your bathroom exhaust fan, and use a dehumidifier if you have one to pull moisture from the air and speed drying.
-
Inspect for remaining growth and repeat if necessary. Check the wall in good lighting after it dries, looking for any remaining discoloration or texture changes that indicate surviving mold requiring a second treatment.
The drying process matters more than most people realize. Wet drywall can hold water behind the paint even if it looks dry on the surface. Give the wall a full 24 to 48 hours to dry completely before considering the job finished, and keep that fan running the entire time. If you rush this step, you’re basically inviting the mold to come right back.
Best Cleaning Solutions for Bathroom Wall Mold
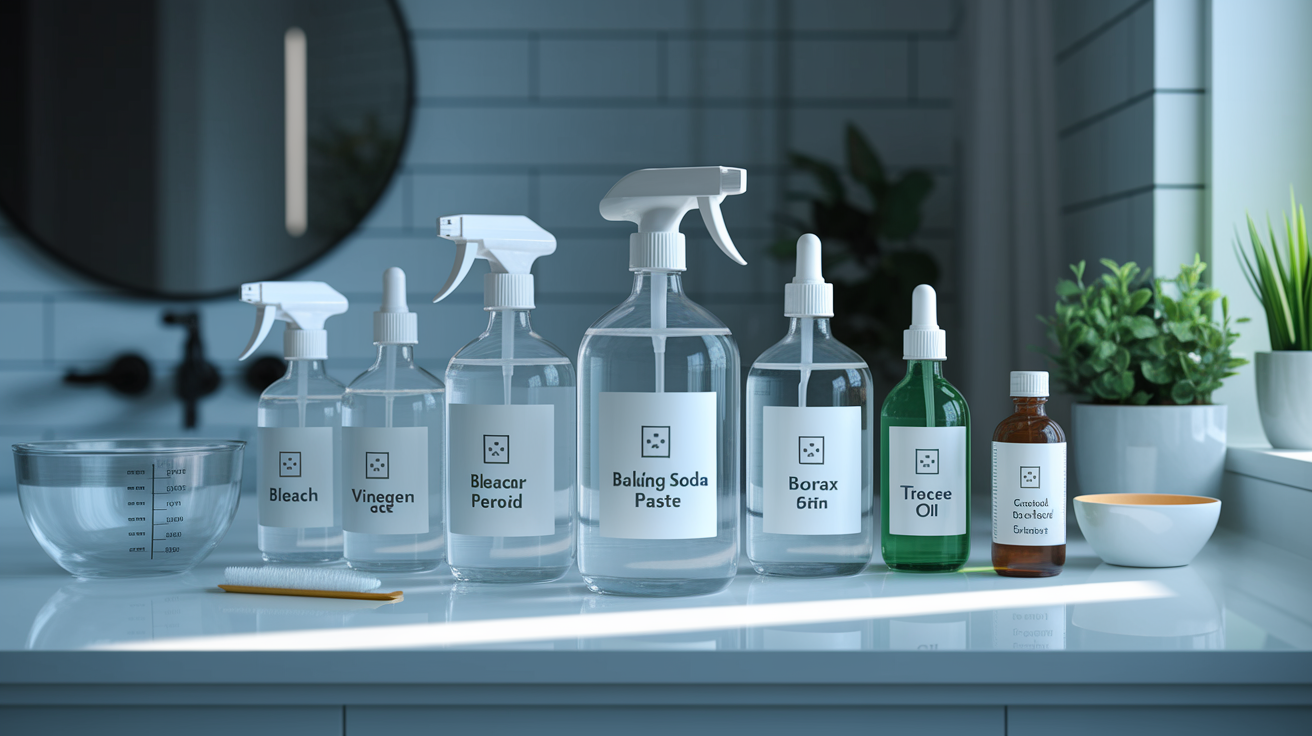
Your cleaning solution options range from harsh chemicals to gentle natural alternatives. The right choice depends on what your walls are made of and how stubborn the mold is. Some solutions work faster but damage certain surfaces, while others take longer but won’t harm paint or grout.
| Solution | Mixing Ratio | Best For | Effectiveness | Safety Notes |
|---|---|---|---|---|
| Bleach | 1 part bleach to 10 parts water | Tile, tubs, non-porous surfaces | Kills surface mold quickly | Harsh fumes, ventilation required, damages some materials |
| White Vinegar | Undiluted (straight from bottle) | Most surfaces including grout and painted walls | Effective for most mold types, slower acting | Safe, mild odor, may need repeated applications |
| Hydrogen Peroxide | 3% solution (as sold in stores) | Painted walls, grout, general bathroom surfaces | Gentler than bleach with antimicrobial properties | Safe for most surfaces, minimal fumes |
| Baking Soda Paste | 1/4 cup baking soda to 2 tablespoons water | Light mold on any surface, safe for all materials | Mild abrasive cleaner, works slowly | Safest option, requires more scrubbing |
| Borax | 1 cup borax to 1 gallon water | Grout, tile, preventing recurrence | Kills mold and inhibits future growth | Don’t rinse off completely for residual protection |
| Tea Tree Oil | 2 teaspoons to 2 cups water | Small areas, natural eco-friendly approach | Natural antifungal, slower results | Strong smell initially, safe for all surfaces |
| Commercial Cleaners | Follow product instructions | Heavy mold, specific surface types | Varies by product and active ingredients | Check compatibility with your wall material |
Always test your chosen solution on a small hidden area first. Like behind the toilet or in a corner. Wait 24 hours to check for damage or discoloration. This 30 second test can save you from ruining your bathroom walls.
Never mix bleach with vinegar or ammonia. These combinations create toxic chlorine gas that can seriously harm your lungs within seconds of exposure. Stick to one solution at a time.
The spray bottle method works best for even coverage. Hold the bottle 6 to 8 inches from the wall and use a steady overlapping pattern. Most solutions need 10 to 15 minutes of contact time to work properly. That means leaving it wet on the wall, not wiping it immediately. Rushing this step cuts your effectiveness in half.
Removing Mold from Different Bathroom Wall Surfaces
Different wall materials need different approaches because mold behaves differently on porous versus non-porous surfaces. What works perfectly on tile might damage drywall. The technique that cleans painted walls can make grout worse.
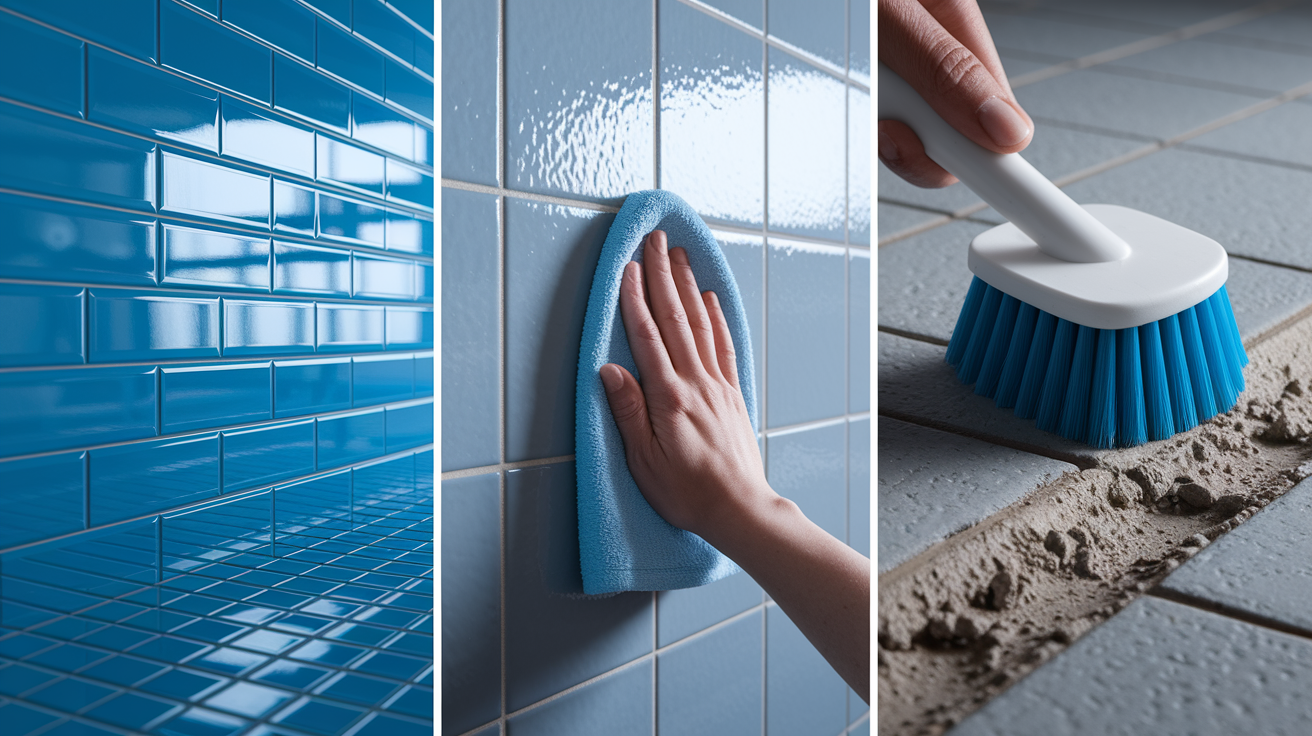
Tile and Ceramic Surfaces
Tile itself cleans easily with any of the solutions from the previous section because it’s non-porous and doesn’t absorb mold. Spray it down, let it sit, scrub with a medium bristled brush, and wipe clean. The grout between tiles is where things get tricky. It’s porous and absorbs mold deeper than surface level, so it needs stronger solutions and more aggressive scrubbing. Use a grout brush or old toothbrush to work cleaner into the grout lines with firm pressure. If grout stays discolored after multiple cleanings or feels crumbly when you touch it, it’s deteriorated and needs replacement. Badly damaged grout won’t hold up to scrubbing anyway.
Painted and Drywall Surfaces
Painted walls can usually be cleaned if the paint is intact and the mold hasn’t soaked through. Use gentler solutions like vinegar or hydrogen peroxide with a soft cloth or sponge instead of stiff brushes that might scratch paint. If paint is peeling, bubbling, or feels soft and spongy behind the mold, moisture has damaged the drywall underneath. Surface cleaning won’t fix this. You’re looking at drywall replacement. Small patches under 2 feet square can be cut out and patched, but larger areas mean bigger repairs. When drywall stays damp after cleaning or shows brown water staining spreading beyond the mold, it’s time to remove and replace that section.
Grout Lines and Caulking
Grout lines collect moisture and soap residue, making them prime spots for recurring growth even after you’ve cleaned everything else. Deep cleaning requires working concentrated solution into the grout with a brush, letting it sit 15 to 20 minutes, scrubbing again, then rinsing thoroughly. After grout dries completely, seal it with grout sealer to make it less porous and easier to keep clean going forward. Caulking around tubs and showers is different. If mold has gotten into the caulk itself, you can’t clean it out. Remove the old caulk with a utility knife or caulk removal tool, clean the surface underneath, let it dry, and apply fresh caulk. It takes 30 minutes and prevents mold from hiding in deteriorated caulk lines.
Corner Accumulation and Ceiling Mold
Bathroom corners where walls meet and where walls meet ceilings trap moisture from condensation more than flat wall surfaces. These spots need extra attention with focused cleaning and longer contact times. Ceiling mold requires working overhead, so protect your eyes with goggles and work in short sessions to avoid strain. Use a spray bottle for application rather than trying to hold a bucket and brush overhead. If ceiling mold covers more than a couple square feet or keeps coming back, you probably have a ventilation problem or a leak from above that needs fixing before cleaning will make any lasting difference.
After cleaning any bathroom wall surface, consider using mold resistant paint designed for high moisture areas. These paints contain antimicrobial ingredients that make it harder for mold to establish new growth. Proper sealing around fixtures and along edges with waterproof caulk keeps moisture from getting behind surfaces where you can’t clean it.
Understanding Black Mold and Health Risks in Bathrooms
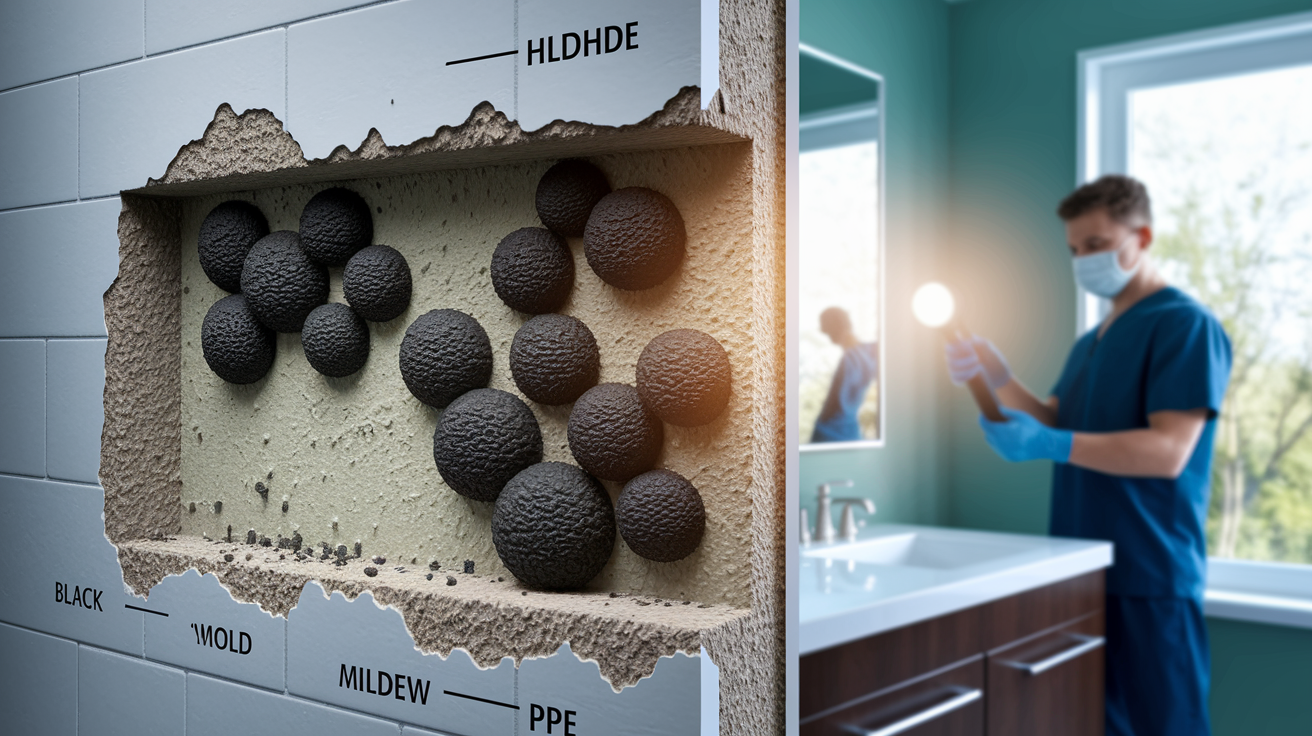
Black mold, mildew, and regular mold all look different and carry different levels of concern. Black mold (Stachybotrys chartarum) appears dark green or black with a slimy texture when wet and grows in consistently damp conditions like behind bathroom walls or under persistent leaks. Common mold shows up in various colors. Pink, orange, white, or green. It grows on surfaces without necessarily penetrating deep. Mildew is a surface level fungus that looks gray or white and powdery, spreading across grout, caulk, and shower curtains. Here’s the thing people get wrong. Not all black colored mold is the dangerous Stachybotrys species. Color alone doesn’t tell you if it’s toxic, and most bathroom mold is regular mold that responds to standard cleaning.
Health effects from mold exposure vary widely based on individual sensitivity and how much time you spend breathing the spores. Common symptoms include respiratory issues like coughing and wheezing, allergic reactions such as sneezing and watery eyes, headaches that won’t quit, and persistent fatigue. People with asthma or existing respiratory conditions often react more severely. Same goes for children, elderly people, and anyone with a compromised immune system. Most healthy adults can handle short term exposure during cleaning if they wear proper protection, but prolonged exposure in a moldy bathroom can trigger problems even in people who’ve never had allergies.
Musty odor is often your first warning sign before you see visible growth. If your bathroom smells like damp basement or old books, you’ve got mold somewhere. Visible discoloration starts as small spots that spread outward if left unchecked. Black or green staining on grout, around fixtures, or in corners indicates active growth. Persistent moisture on walls, condensation that doesn’t dry between showers, or that clammy feeling in your bathroom all signal conditions where mold thrives. When you see mold on your bathroom wall, assume there’s more behind the surface or in less visible spots. Early detection matters because small patches you can clean today become removal projects requiring professional help if you ignore them for months.
When to Call Professional Mold Remediation Services
Most bathroom wall mold falls within DIY territory. Surface growth you can see and reach, covering a small enough area that you can handle it safely with basic equipment. But certain situations cross the line into professional help needed territory where trying to DIY it creates bigger problems than you started with.
Call professionals when:
-
Mold coverage exceeds 10 square feet (roughly a 3 foot by 3 foot area) because larger infestations require containment barriers and industrial equipment to prevent spreading spores throughout your home during removal
-
Suspected black mold or toxic mold species is identified or you’re showing serious health symptoms when in the bathroom, since proper testing and specialized removal procedures prevent dangerous exposure
-
Mold returns repeatedly after multiple DIY attempts because recurring growth indicates a moisture source you haven’t identified or structural issues requiring professional diagnosis
-
Mold behind walls or in HVAC systems where you can’t access it safely without opening walls or ductwork, and incomplete removal just lets it keep spreading
-
Extensive water damage affecting multiple areas from flooding, burst pipes, or long term leaks that have compromised building materials beyond surface cleaning
-
Health symptoms worsen despite cleaning efforts or multiple household members develop respiratory issues, headaches, or allergic reactions that improve when they leave the house
-
Structural damage to drywall or building materials where walls feel soft, show brown staining, or have visible deterioration requiring removal and replacement rather than surface cleaning
Professional mold remediation typically costs between 500 and 6,000 dollars depending on the extent of damage, with most small bathroom projects falling in the 500 to 1,500 dollar range. Larger projects involving wall removal, extensive contamination, or whole room treatment push costs higher. Factors affecting price include square footage of affected area, accessibility of the mold location, type of materials involved, and whether structural repairs are needed after removal. Getting multiple estimates helps, and pricing should include both removal and prevention measures to address the root cause.
Professional services provide capabilities beyond DIY methods. They set up containment barriers with plastic sheeting and negative air pressure to prevent spores from spreading to other rooms during removal. HEPA filtration systems capture airborne spores that escape during cleaning. Specialized equipment like moisture meters and infrared cameras locate hidden mold and water sources you can’t see. Professional mold testing identifies specific species and determines if mold exists behind walls or in crawl spaces where visual inspection can’t reach. The whole process typically takes 1 to 3 days for a bathroom compared to the extended timeline of repeated DIY attempts. Some homeowner insurance policies cover mold remediation when it results from sudden water damage like burst pipes, though they often exclude gradual damage from neglected maintenance. Check your policy before assuming coverage.
Preventing Mold Recurrence: Moisture Control and Maintenance

Prevention works better than removal every single time, and it’s way less work. You can scrub your bathroom walls perfectly clean today, but if you don’t fix what caused the mold, you’ll be scrubbing again in two months. The fundamental strategy comes down to moisture control. Keep your bathroom humidity below 50% and mold can’t establish itself no matter how many spores float through the air.
Removal only succeeds long term when you prevent recurrence. Otherwise you’re just on a cleaning treadmill that never stops.
Moisture and Humidity Management
Bathroom humidity should stay below 50% to create conditions where mold can’t grow. Use a simple humidity meter (available for under 20 dollars at hardware stores) to track levels, and you’ll notice patterns showing when your bathroom stays too damp. Dehumidifiers designed for small spaces pull moisture from the air continuously, which helps in bathrooms without windows or adequate ventilation. The real problem is condensation. When warm humid air from your shower hits cool bathroom walls, water forms on the surface within minutes. If that moisture doesn’t evaporate quickly, mold conditions develop within 24 to 48 hours.
Environmental conditions change with seasons. Summer humidity makes bathrooms damper even without showers, while winter heating can dry air out until you run hot water that creates steam. Understanding these patterns helps you adjust your prevention approach through the year.
Ventilation and Air Circulation Best Practices
Your exhaust fan is your first defense. Run it during every shower and keep it running for 20 to 30 minutes after you turn off the water. This removes humid air before it condenses on walls and fixtures. If you have a window, open it during and after showers for natural air circulation. The combination of fan and window works better than either alone.
Proper ventilation habits mean building a routine. Turn on the fan before you step in the shower, not after. Leave the bathroom door open when you’re not using the room so air circulates instead of sitting stagnant. Check that your exhaust fan actually works by holding tissue paper near the vent. If it doesn’t pull the paper toward the vent, the fan motor needs replacement or the ductwork is blocked.
The shower area generates the most moisture by far. During a typical shower, humidity in an enclosed bathroom spikes to 80 to 90%. That’s why shower walls and corners around tubs show mold first. Wipe down shower walls, bathtub surrounds, and glass doors with a towel after each use. It takes 30 seconds and removes moisture before mold can establish.
Ongoing Monitoring and Maintenance Schedule
Weekly monitoring for new growth spots during the first month after mold removal helps catch any recurring patches while they’re still tiny and easy to treat. Bi weekly cleaning with disinfectant solutions keeps surfaces clear of soap scum and body oils that mold feeds on. Monthly inspection of grout and caulking condition identifies deterioration before it becomes water intrusion behind surfaces. Quarterly deep cleaning of shower area and bathtub surround removes buildup in corners and along edges where regular cleaning misses.
Annual caulking replacement around fixtures prevents aged caulk from cracking and allowing moisture penetration. Annual resealing of grout lines maintains the protective barrier that keeps grout from absorbing water and mold spores. Seasonal check of exhaust fan functionality ensures your ventilation system works when you need it most. Fix leaky pipes and plumbing issues immediately when you notice drips or standing water, since even small leaks create mold conditions fast. Wipe down shower walls and bathtub surround after each use to eliminate the primary moisture source for mold growth. Use mold resistant paint and building materials for any repairs or renovations in bathrooms.
Catching small recurring patches early lets you spot treat them with a quick spray and wipe instead of starting the whole removal process over. If you see the same spots developing mold repeatedly, you haven’t solved the moisture problem. Look for condensation patterns, check for leaks behind the wall, or improve ventilation in that specific area.
Sealing gaps and waterproofing around fixtures, pipes, and corners prevents moisture from getting into wall cavities where you can’t see or reach it. Check these spots during your monthly inspection and touch up caulk or sealant as needed.
Mold resistant products including paints with antimicrobial additives, mold resistant grout, and waterproof caulks provide additional layers of protection. These products don’t replace moisture control. They work alongside it. A bathroom with poor ventilation will still grow mold even with mold resistant paint, but a properly ventilated bathroom with mold resistant products stays cleaner longer with less maintenance effort.
Final Words
Bathroom wall mold removal isn’t complicated, but it does require the right steps in the right order.
Proper protective gear, the right cleaning solution for your wall type, and thorough drying make all the difference between a one-time fix and a recurring problem.
Most small patches respond well to DIY methods when you address moisture at the source. Keep humidity below 50%, run that exhaust fan, and check back weekly for the first month.
If growth keeps coming back or covers more than 10 square feet, it’s time to bring in a professional. Either way, you’re taking control of the problem, and that’s what matters.
FAQ
Q: How do you permanently remove mold from bathroom walls?
A: Permanently removing mold from bathroom walls requires cleaning with bleach, vinegar, or hydrogen peroxide solutions, followed by thorough drying and moisture control. The key is addressing humidity and ventilation issues that allowed mold to grow initially, not just scrubbing visible growth.
Q: Can mold grow behind bathroom walls?
A: Mold can grow behind bathroom walls when moisture penetrates through damaged caulk, leaky pipes, or porous drywall. Hidden mold often indicates persistent water intrusion and may require professional inspection, especially if you notice musty odors without visible growth or recurring surface mold despite repeated cleaning.
Q: Is black mold in bathrooms toxic?
A: Black mold in bathrooms can cause respiratory issues, allergic reactions, headaches, and fatigue, especially in children, elderly, or immune-compromised individuals. Not all black-colored mold is the dangerous Stachybotrys species, but any persistent black growth covering more than 10 square feet warrants professional evaluation and testing.
Q: Does vinegar kill mold on bathroom walls?
A: Vinegar kills most mold types on bathroom walls when applied undiluted and left for contact time. White vinegar works effectively as a safer alternative to bleach for various surfaces, though porous materials like unsealed drywall may need replacement if mold has penetrated deeply.
Q: When should you call professionals for bathroom mold removal?
A: Call professionals when mold covers more than 10 square feet, returns repeatedly after DIY cleaning, penetrates behind walls, or causes worsening health symptoms. Professional remediation typically costs 500-6000 dollars and includes containment barriers, HEPA filtration, and proper disposal methods not available to homeowners.
Q: What humidity level prevents bathroom mold growth?
A: Bathroom humidity should stay below 50% to prevent mold growth. Run exhaust fans during showers and for 20-30 minutes after, use dehumidifiers in poorly ventilated spaces, and wipe down wet surfaces immediately since condensation creates mold conditions within 24-48 hours.
Q: What cleaning solution works best for bathroom wall mold?
A: The best cleaning solution depends on surface type and mold severity. Bleach (10% solution) kills mold on non-porous tile, vinegar works safely on most surfaces, and hydrogen peroxide (3%) offers gentler antimicrobial action. Never mix bleach with vinegar or ammonia due to toxic gas production.
Q: How do you remove mold from bathroom grout?
A: Remove mold from bathroom grout using stronger cleaning solutions than tile surfaces, scrub with stiff brushes to penetrate porous material, and seal grout lines after cleaning. Replace deteriorated grout and caulking rather than cleaning if mold has caused structural damage or persistent staining.
Q: What protective equipment do you need for mold removal?
A: Mold removal requires N95 or N100 respirator masks, waterproof rubber gloves, safety goggles, and long-sleeved clothing. Proper ventilation with open windows, running exhaust fans, and HEPA air purifiers protects against airborne spores that cause respiratory issues during scrubbing and cleaning.
